NewsBot
New Member
- Messages
- 111,281
- Reaction score
- 2,947

A play by play breakdown of Tyrone Crawford's day against the Saints.
92nd percentile. That's where Tyrone Crawford ranks against his peers according to ProFootballFocus.com, as reported by our very own O.C.C. While traditional stats don't reflect as well on #98, there is a growing consensus that the former third-round pick is growing into an integral cog of the revamped Cowboys defense. So what exactly does the tape say? Here's the play by play breakdown of Tyrone Crawford's day against the Saints.
1st Play: Tyrone Crawford is lined up as the 3-Tech. It's a rough start as Crawford is clearly the last lineman off the ball.

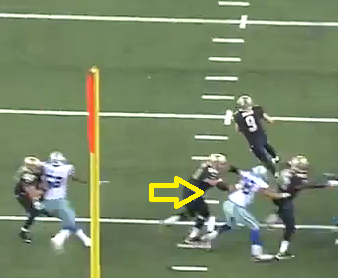
Despite his bad jump, Crawford does a good job against this run play; he's able to cross his blockers' face as you cane see below (yellow arrow). An interesting aside, Jeremy Mincey (red arrow), actually does too good a job getting upfield. His penetration has created a pretty big hole for the RB.
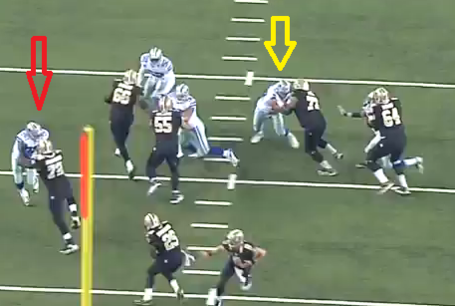
Crawford ends up getting held by Saints #77, and the running back picks up four yards. Still, it's a good play by Crawford after a slow start
Play 2: Pass play. Crawford lines up at 3-Tech (he'll be there most of the game, I'll label when he's not). Uses pure brute strength to walk his blocker back. Below we can see him man up with the guard.
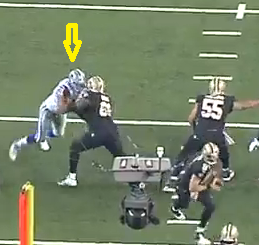
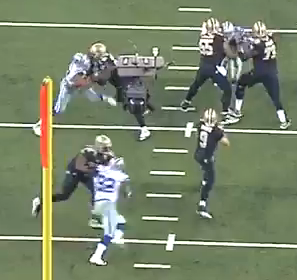
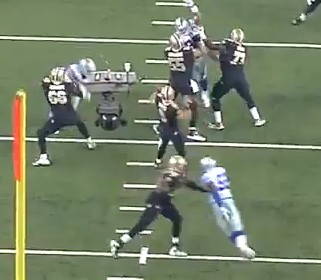
Notice that he's about five yards behind the line in the third picture. No pass rush moves on this, it was simply him pushing the lineman back.
Play 3: Crawford attacks the guard's outside shoulder, while a linebacker shoots the A gap inside. Quick throw by the QB, no pressure.
Play 4: Crawford uses a bullrush against the lineman. Quick throw by the QB. Crawford disengages from his blocker and chases the play seven yards downfield.
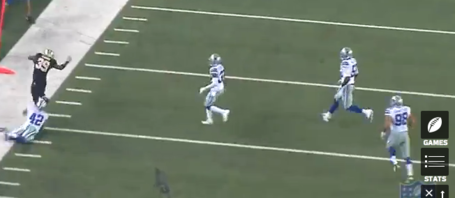
Play 5: WR screen. Crawford beats his blocker, but it's a quick pass, no pressure.
Play 6: Stunt with the linebacker; Crawford crashes inside and the LB loops around the edge. Brees feels the pressure and takes off scrambling for a big gain.
Play 7: Crawford not in. I'm going to skip the plays he's sitting, so the play count will skip every once in a while.
Play 13: Crawford rushes and walks his man back using power.
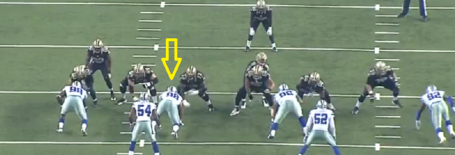

The picture above showcases exactly what the 4-3 under is about. Notice that all the other rushers are double teamed, but Crawford at the 3-Tech is left 1 on 1 (notice also that the Saints have seven blockers on four rushers, leaving seven Cowboys in coverage against three receivers).
Below we see that Crawford has beaten his man, and is making a play on Brees. This should have been a sack but Brees makes an amazing throw as he's falling down.
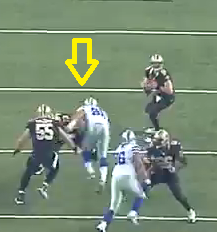
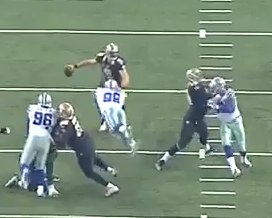
14th Play: Bull rush, no pressure.
15 Play: This is a really interesting play. We see Crawford use a pass rush move for the first time, stepping inside then using a really powerful swim move to get back outside:
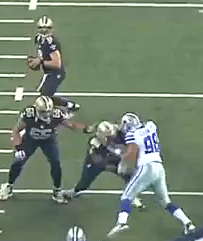
The fake inside has absolutely bamboozled the center; he moves to help with Crawford, but can't get across the guard after Crawford moves back outside. Tthis also demonstrates why you don't need a dominant 1-Tech to draw the double team; it's hard for the center to get to the 3-Tech if he goes outside.
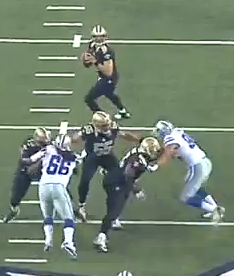
The Center finally gets in on the action but by then it's too late; Crawford has beaten the guard and the center is only able to engage him in passing.
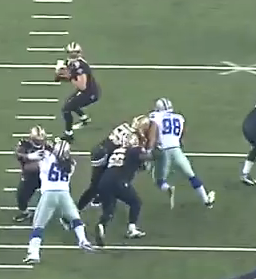
It's a good play by Crawford; if Ken Bishop had been able to take advantage of the single blocker, Brees would have been in trouble.
Play 16: Run to Crawford's side. He does a good job of holding his ground and stringing the run outside.
Play 17: Crawford lines up at the 1-Tech with Henry Melton at the 3-Tech. Double teamed, no pressure.
Play 19: Crawford and the DE both crash inside. Crawford gets blocked into a double team with the center, the DE gets good pressure.
Play 20: Both DT's crash inside, Bishop crosses behind Crawford and gets good pressure on Brees who throws an interception.
Play 23: Lines up at 1-Tech. Drops into coverage. Actually has pretty good coverage on crossing receiver (red arrow).
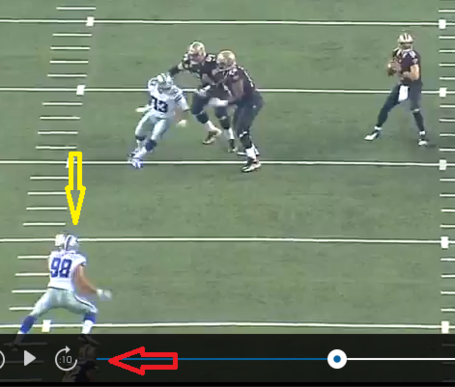
Play 24: 2-Minute offense. LDE on 3 man line. Draw play, ends half.
Play 25: Crawford is quick off the snap and beats his man inside on a run (and splits a double team) going the other way:
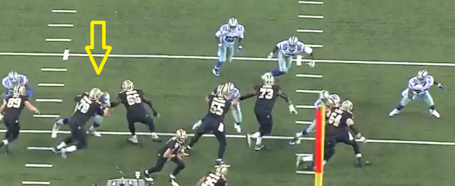
Play 26: Another pass rush move! Crawford again uses the swim to beat his man. Forces the RB to pick him up, and eventually the center moves over to help out.
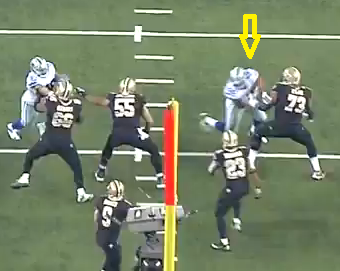
Play 27: Slants inside, gets double-teamed. Bats down pass.
Play 28: Run play. Crawford beats his man and gets into the backfield, but penetrates too deep. The RB cuts back underneath him, something that has happened quite a bit so far this season to all our linemen.
Play 29: Slants inside, no pressure.
Play 30: Lines up as the 1-Tech. Stunt with DE. DE crashes inside, Crawford loops around the edge. Gets hand in Brees's face.
Play 32: Crashes inside hard, splits guard and center. Good pressure but quick throw by Brees.
Play 33: Run the other way.
Play 35: Stunt with the DT, they cross crashing inside. Screen pass, Crawford is able to disengage and chase it down from behind.
Play 36: Stunt. Crawford and DE crash inside, 1-Tech loops around. Crawford picked up by OL.
Play 37: Bullrush, good penetration.
Play 41: Crashes in, double teamed. No pressure.
Play 42: Drops into coverage.
Play 44: Bull rush. Moves man back some, but not much pressure.
Play 45: This is an interesting play. Crawford doesn't actually see the ball snap; McClain is yelling at him about something and Crawford is actually looking backwards when the ball is snapped:
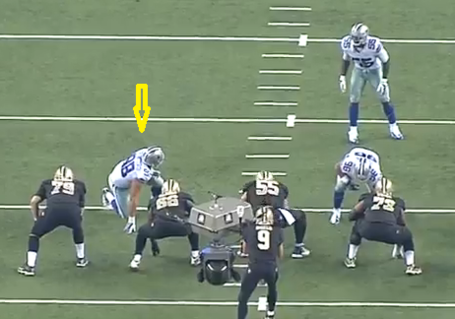
Rolando is apparently calling out something the line should be responding to, because Crawford is looking at Nick Hayden and pointing at something while everyone else is moving:

I'm pretty sure Crawford is going to get ragged some in the film room over this play, but in his defense he was able to recover and not get run over by his blocker.
46: This was the big run play that sets up the Saints first score. Goes away from Crawford, but he was beat the whole way and couldn't get off his block.
47: The Saints first TD comes off a play fake following the big run. Crawford bites really hard on it and is blocked inside while Brees rolls out towards his side:
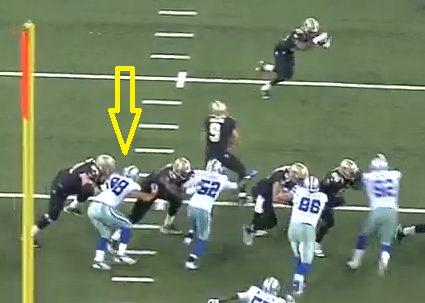
Play 50: Blocked, no pressure.
Play 51: Slants inside, double teamed by guard and center. No pressure.
Play 52: Poor Tyrone Crawford. Want to know how Jimmy Graham scored his touchdown? Well it started like this:
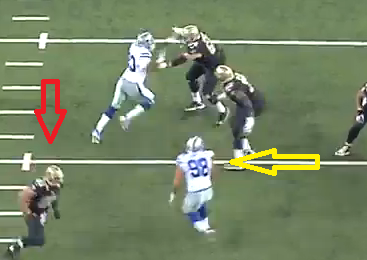
The Yellow arrow is Crawford dropping into a zone and backpedaling to his left. The red arrow is Jimmy Graham crossing behind him in the opposite way. Uh-oh...
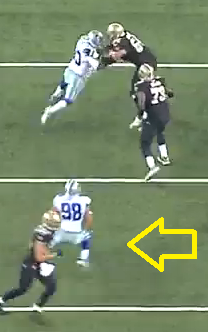
To Crawford's credit, he notices Graham crossing behind him, and attempts to change direction. Unfortunately most linebackers and defensive backs have problems covering Graham...
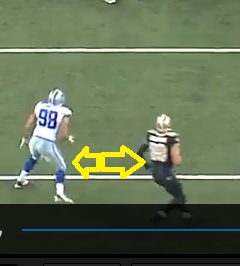
This really wasn't even fair to Tyrone. Touchdown.
Play 53: Marinelli does something interesting here, as the entire line moves one gap to the right. Crawford, who had lined up as 3-Tech, ends up playing as the 1-Tech. He ends up drawing three blockers, and the line gets good pressure on Brees.
Play 54: Crawford bull-rushes the guard's outside shoulder. He gets good penetration but can't turn the corner and falls down.
Play 55: 3-man rush. Crawford lines up as the RDE. Bull rushes. Gets great pressure and forces Brees to scramble and check down. Crawford ends up running down the receiver and tackling him from behind.
Play 56: The fake punt. Crawford is one of the first to read it, and tracks down the punter, but somehow misses the sack!
Play 57: Lines up as 1-Tech, gets double teamed, no pressure.
Play 58: No pressure.
Play 59: Lines up at LDE. Bull rushes, gets good pressure, but quick throw.
Play 60: Slants inside, blocked by center.
What Does it Mean? A few takeaways after watching the film. First, Crawford is an extremely high effort guy; on numerous occasions he chases down a runner or receiver from behind. There's nothing about him that really stands out when he plays, but he is always near the ball and making plays. He has pretty good power but limited pass rushing moves, he relies way to much on his bull rush.
A lot of people have been wanting to see Crawford play 3-Tech, and he acquitted himself well. If I had one complaint it was that he took the inside gap too much, negating one of the primary strengths of the 3-Technique. By slanting inside he enabled the center to help the guard with the double team.
As noted above, Crawford showed few pass rush moves, but when he did attempt a swim move he did an excellent job and used it to good effect.
All in all a really solid game by a young player coming into his own.
What do you think BtB? Do you agree with my assessment? And what player would you like to see in the film room next week?
Continue reading...

