Guitar Refinish

Creeper

Well-Known Member
Messages
13,971
Reaction score
17,741
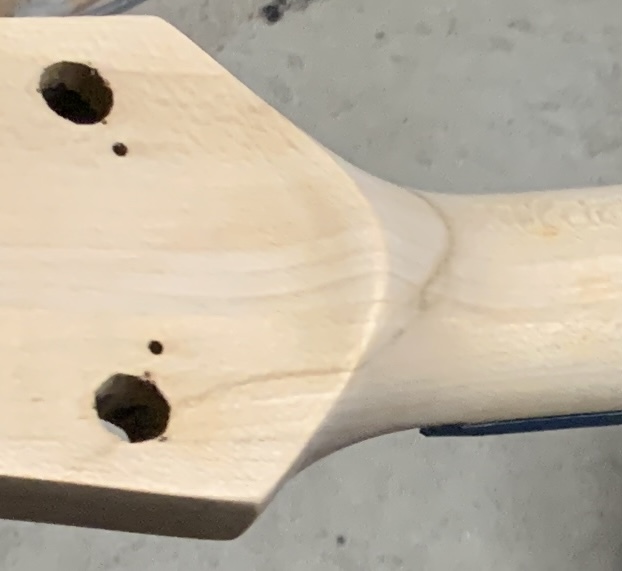
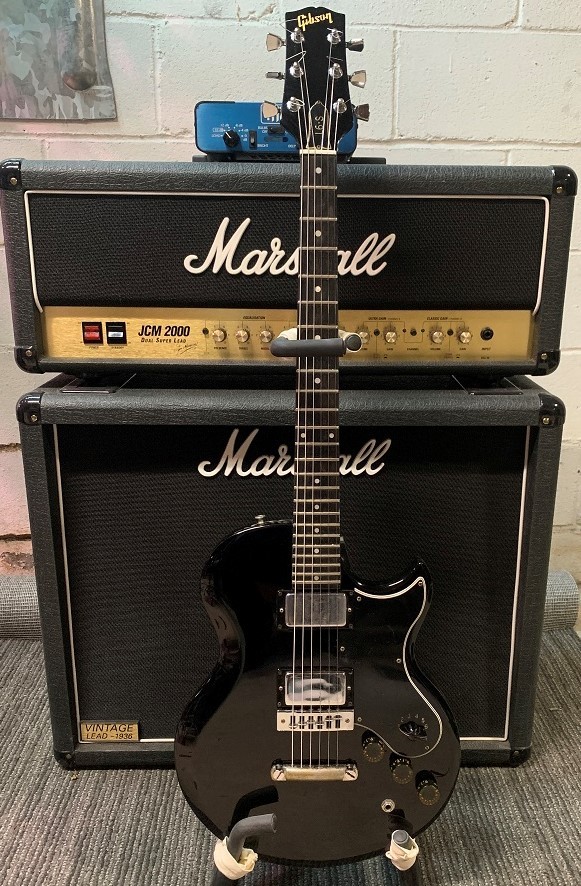
I inherited a 1976 Gibson L-6 S guitar from my brother who recently passed. It was pretty beat up and had a pretty severe crack in the neck which extended into the headstock.

My first task was to fix the headstock which was separating from the neck. Some wood glue and clamps allowed me to reset the headstock into the right position but the damage around the crack still had to be repaired. I filled the cracks with glue and putty and sanded it out but their was some bare wood around the sanded areas so I decided to strip the entire guitar and repaint it. It was gloss black and I am restoring it to it's original color.

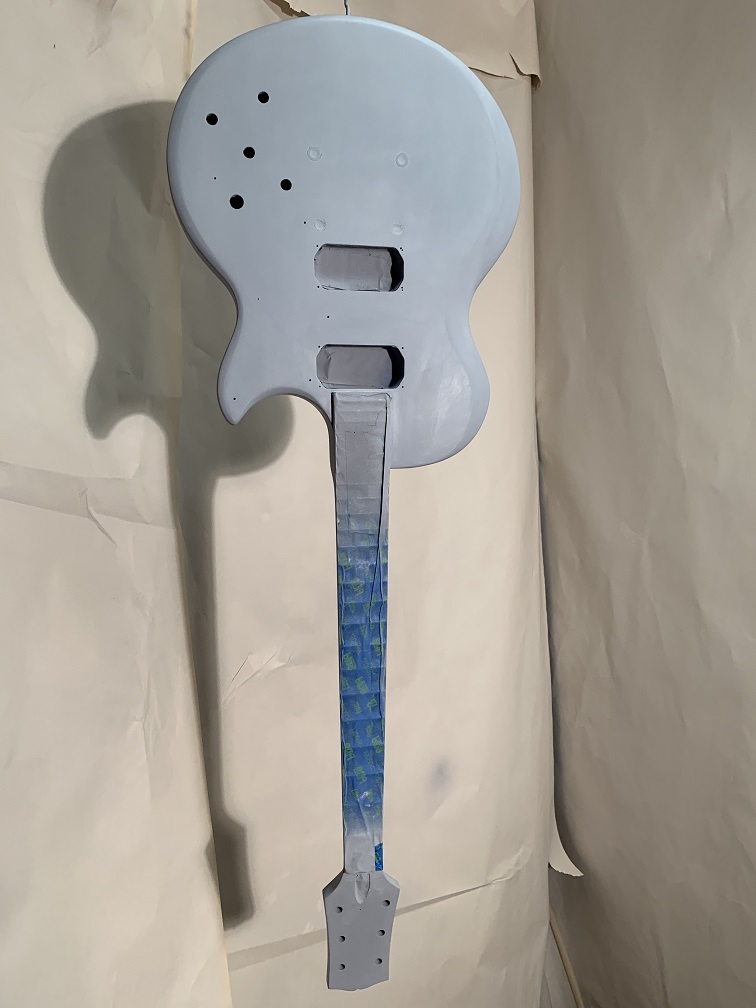
In short I sanded out the entire guitar taking off all the paint. Before spray painting, I taped all the areas where I don't want paint, like the fret board. This guitar has a rosewood or mahogany fretboard so down the sides of the neck about 1/8" of the rosewood is exposed. I taped over this so the rosewood will be natural after the guitar is finished.

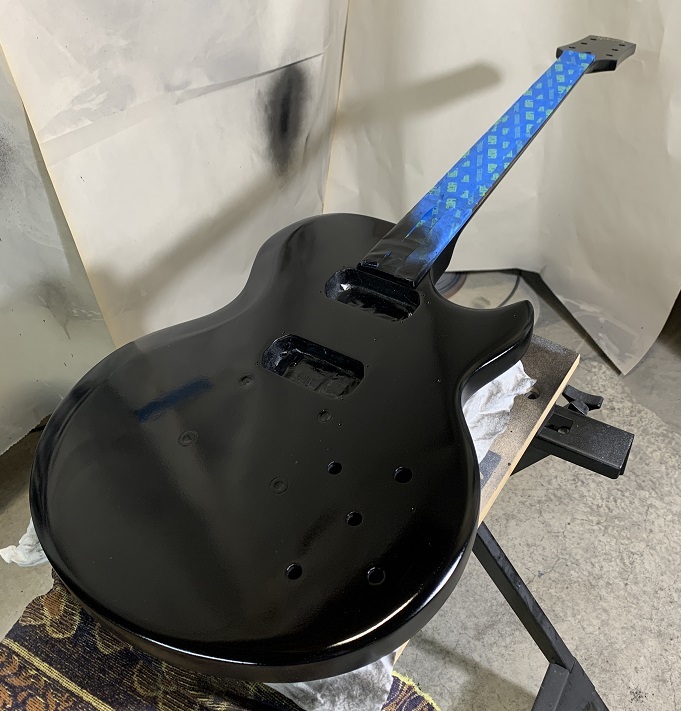
I got a few coats of primer on the entire guitar and wet sanded it to a very smooth finished in preparation for application of the black lacquer. But something occurred to me. After applying 3-5 coats of black lacquer and another 8-12 coats of clear lacquer there is going to be a fair thick coat of various paints on the guitar, including the neck. When I peel the tape off the rosewood fretboard I imagine there will be a noticeable ridge where the newly painted area of the neck meets the rosewood fretboard.

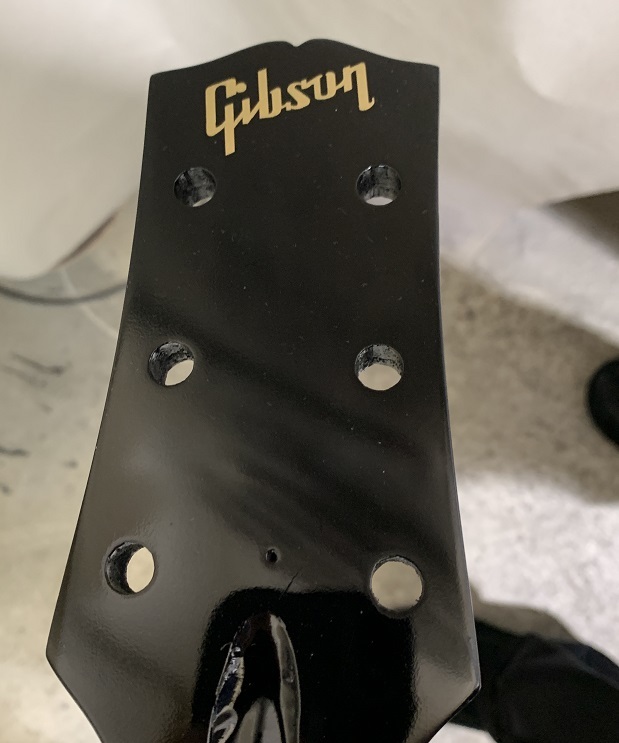
So now I am wondering how to fix this. If the neck was removable like the necks on Fender guitars I probably would have left the neck natural wood and finished it with oils instead of paint and lacquer. But given the crack repair and the fixed neck I chose to paint it like it was originally. I could probably sand this but I have to be careful not to ruin the polished finish. I was thinking of maybe trying a razor blade to very lightly back scrape just the ridge until it disappears then using steel wool to buff out the finish. Maybe even some polishing compound to finish it off. Of course the danger is I removed too much lacquer and the primer of bare wood shows through. That would be a disaster.

Anyone with guitar finishing or woodworking experience have any thoughts on how to resolve this?
 

Vtwin

Safety third
Messages
8,117
Reaction score
11,043
Ahh, the old Gibson cracked headstock problem....

I'm not an expert but my thought would be to find the finest grit emery board I could and carefully bevel the edges. The stiffness of the emery board would give precise control of the contact area.

Sorta like sharpening an axe with a file.

Looking forward to seeing the pics.
 

jsb357

Well-Known Member
Messages
7,566
Reaction score
7,272
found this on the interwebs...

I spray about 5 coats on the spruce top, and 9 coats on the rest of the guitar (pore-filled mahogany or rosewood). These are 'double wet coats', spraying a light coat followed by a heavier coat to fully wet the surface. This spraying technique is done to minimize runs. I use Mohawk Classic Instrument Lacquer or Piano Lacquer, thinned about 10%. After wet sanding and buffing I have a film thickness of about 0.0025" to 0.003" on the top, and about 0.005" on the rest.

So if it's a spray application it probably won't be an issue.
 

Creeper

Well-Known Member
Messages
13,971
Reaction score
17,741
Ahh, the old Gibson cracked headstock problem....

I'm not an expert but my thought would be to find the finest grit emery board I could and carefully bevel the edges. The stiffness of the emery board would give precise control of the contact area.

Sorta like sharpening an axe with a file.

Looking forward to seeing the pics.
Crack is an understatement. It was a few pounds of pressure from being broken off I think. I like your idea though. I have 3000 grit sandpaper I can fix it to a flat object and make a pretty good tool to do exactly as you suggest.
 

Creeper

Well-Known Member
Messages
13,971
Reaction score
17,741
found this on the interwebs...

I spray about 5 coats on the spruce top, and 9 coats on the rest of the guitar (pore-filled mahogany or rosewood). These are 'double wet coats', spraying a light coat followed by a heavier coat to fully wet the surface. This spraying technique is done to minimize runs. I use Mohawk Classic Instrument Lacquer or Piano Lacquer, thinned about 10%. After wet sanding and buffing I have a film thickness of about 0.0025" to 0.003" on the top, and about 0.005" on the rest.

So if it's a spray application it probably won't be an issue.
I hope you are right but I can see the primer already building up near the tape. I am considering peeling the tape off prior to applying the clear coats and re-taping only on the top of the fretboard. This way the rosewood fretboard will still show through the clear coat but the ridge problem will be mitigated by the layers of clear coat to some degree.

Thanks for the reply.

After this one, I am going to refinish an old Guild acoustic guitar which someone else already attempts to refinish but did a half-donkey job on it. It cost me nothing but it has a great sound and nice soft action. The previous owner was a smoker and the guitar has a distinct orange tint to it from nicotine. The nicotine literal infused into the clear coat or shellac.
 

BrAinPaiNt

Mike Smith aka Backwoods Sexy
Staff member
Messages
77,854
Reaction score
40,679
CowboysZone ULTIMATE Fan
Hope it turns out great. Please post pics when you have it finished.

On a side note.
For those guitar guys out there, if you have not subscribed or watch it.

https://www.youtube.com/user/MrTrogly

Guy does reviews of a bunch of Gibsons. Also buys and sells them.
Sometimes he will show what the gibson demo and mod sites have in stock.

Mostly gibson but sometimes he does a fender friday.
 

Creeper

Well-Known Member
Messages
13,971
Reaction score
17,741
This is taking longer than I thought. The sanding and priming went somewhat smoothly. I bought Guitar spray paints in aerosol cans for the color and finishing coats from Stew Mac and that is where my first real problems began. Almost immediately I noticed the spray pattern is not flat like I wanted, it was more of the traditional circular patters you get with typical spray paints. I primed the guitar with Rustoleum automotive primer so I was prepared for dealing with the more focused spray pattern, however, lacquer is not as forgiving as primer, especially black lacquer. The first two light coats went pretty well although getting the right overlap was tricky. It was the third thicker coat where I ran into some problems. A drip. and then some "orange peel, which of course was on the front of the guitar. The neck and headstock came out perfectly, probably because they are smaller surface areas that do not require a wider spray pattern.

A couple of things I found out. First, using your pointing finger to press the spray button gets tiring and also it is not easy to get into a good rhythm. Concentrating on pushing my finger down enough to get a good even coat took some concentration and I found myself drifting away from the guitar causing some overspray. I found a device on Amazon that attaches to the spray cans and has a handle with a trigger, like a more typical spray gun. I'll see if that makes the spraying easier as many people have suggested. I also found upgraded spray nozzles for the paint itself. These supposedly create a wider flatter spray pattern with a finer mist which should help with the orange peel finish.

Speaking of which, the only way to fix the orange peel is to sand it off. It is a common problem when clear coating so I used the same technique for the color coat. The difference is the color coat will be covered with more color paint and about 10 coats of clear so I can use a courser sand paper to wet sand the orange peel out.

At this point I have completely wet sanded out the orange peel and the drips (I had two, one was very minor but I sanded it out anyway).

The guitar is ready for painting again but I am stopping work until my new nozzles arrive. I an not going to risk more orange peel or other mistakes. I also have some other projects I have to get to. The sanding did not remove all of the color. In fact the primer is only showing on a few of the sharper edges. I think I may only need another 2 coats of color to wrap this phase up. Hopefully, I can avoid dust particles in the final two coats which have not been a major problem so far, but even 1 speck can ruin a perfect paint job. The the fun starts.

Also, my water slide decal for the Gibson logo arrived. They are almost identical to the original decal. Once the color coats are done I will apply the decals before the clear lacquer.
 

Creeper

Well-Known Member
Messages
13,971
Reaction score
17,741
Another update, if anyone cares. I am hoping others learn from my experience. This is not really as daunting as one would expect so if you had thoughts about picking up an old beat up guitar for a few bucks, or for free, you can give it a new finish and turn the ugly duckling into the queen of the ball.

I decided to finish color painting the neck and headstock on my guitar at this point just to make it easier on myself. I taped off the body and laid the guitar down flat on it's back with the headstock overhanging my workbench and added another coat of gloss black front and sides of the headstock. Then I flipped the guitar over on it's front side and anchored the body to the workbench while the neck is completely suspended in the air. I added another coat of black to the neck and backside of the headstock. The finish came out perfectly. I found out I was not heating the lacquer hot enough before spraying. The difference between 110 degrees and 130 is huge. The paints disperses better and flows more evenly when it settles on the surface of the guitar. The result is a smooth shiny finish with no visible imperfections. Except for....

This tiny crack in the headstock from where I had repaired the larger crack in the neck. For some reason this crack was not visible after the first two coats of color and the 3 coats of primer before that. When it was bare wood I filled it with wood glue and sanded it smooth. It is not so much a crack now as an indentation where the crack was. I still cannot figure out why it decided to appear after the last coat of color. Maybe the warm lacquer opened the crack a bit? I cannot imagine the lacquer in an aerosol was hot enough to change the wood but somehow the little <b-word> was there now. And I felt compelled to fix it. I didn't go through all this effort to not get a near perfect finish! So last night I sanded that area around the crack down to the bare wood or nearly bare wood. I filled the crack with crazy glue and used a flat object to spread the excess flat and thin. I sanded it smooth and primed it once more. Again, It was not perceptible when I ran by finger over it but it showed up after painting. Oh, no. No chance this little tormenter is going to get the better of me. I sanded it out again today, used a pin and hobby razor to lightly scrape out the crack making it just a little larger but also hoping the glue would settle into the crack better this time. More crazy glue, more flat object to press the glue into the crack and smooth out the excess and more time to dry. Then, more sandpaper, 400, 600, and 1500, and the spot was smooth as a baby's cheeks. I cleaned up the dust with naphtha and gave it two more coats of primer. (I taped off the area so avoid getting primer all over the rest of the guitar). I waited 4 hours and sanded again. The crack is gone, the area is smooth and tomorrow I will repaint that side of the headstock again. 2 coats over the repair and one more over the entire neck and headstock.

If all goes well, the neck/headstock will be ready for the Gibson decals and clear coat. Before I do that I have to put another two color coats on the body. I need the new spray nozzles for that first. I hope they arrive this week. I am going to try to use waterslide decals to replace the "L-6 S", "Made in USA" and serial numbering on the back of the head stock. I've used water slide decals on model cars when I was a kid. But I may try to print my own decals for the "Made in" and serial number. I have alphabet decals but cutting out the individual letters and aligning them on the guitar may require more patience than any human can muster.

By the way, for the answer to my first question about the paint on the neck where I taped over the fretboard, I consulted my Les Paul Studio to see how that was finished. Sure enough they clear coated, but did not paint, the sides of the fretboard. So I will proceed with my plan to removed the tape and re-tape only the top of the fretboard.

I am way off my original 10 day timeline at this point thanks to drips and this crack, but time it not important. I now believe I need another 10-14 days to finish this up. Then it needs another two weeks for all the lacquers to cure before I put all the tuners, pots and pickups back in. I am using all the old electronics, tuners and bridge. This is a restoration not and upgrade.
 

Creeper

Well-Known Member
Messages
13,971
Reaction score
17,741
Quick update. Today I finished the final coat of clear lacquer. I discovered a few things in this process. First, clearcoat behaves much differently than color coat. It is thinner, runs more easily, but also is levels out better once it dries. Also, unless you have a sterile tent, it is almost impossible not to find little specs of dust in the clear coat once it dries. But sanding it out when it dries is easy and the next coat restores the shine so it is not a huge problem. Overall, I am pleased.

Now comes the finishing and buffing. I have never done this before and to be honest I am a little nervous, but if I screw it up I can always add another layer of clear coat. I have to let the guitar cure for a couple of days before the next step.

This process involves wet sanding with super fine grit sandpaper, then rubbing compound, then polishing compound. At the end of this process the guitar should have a perfectly smooth, glossing factory finish. Fingers crossed.

Then more time to allow the clear coat to cure, then I can reassemble the guitar.

Again, the one thing I wish is that the neck on this guitar was removable. It would be so much easier to deal with the body and neck if I could separate them. Gibson apparently doesn't believe in separate necks. The removable neck allows some options in the finishing process. For one, It can be finished in natural wood color while the body is painted. But it is just easier to paint if the neck and body were separate.
 

dsturgeon

Well-Known Member
Messages
4,144
Reaction score
3,961
a time lapse video from start to finish would have been pretty cool
 

Creeper

Well-Known Member
Messages
13,971
Reaction score
17,741
While I am waiting 2 weeks for the clear coat on the Gibson to dry before I buff it out, I came across an old Guild G37 acoustic for free. I sounds great and it is very playable for an acoustic. But someone painted over the original finish with some kind of shellac or something. It has a slight reddish tint to it, it is uneven and they painted over everything including the bindings, bridge, pickguard, headstock with the Guild inlays - basically everything but the tuners and fretboard. It also has two cracks. So while have time on my hands, I decided to refinish it too! I fixed the two cracks with crazy glue but now I need to fill them with wood filler. I sanded the entire guitar and cleaned the bindings of all the shellac and whatever. The binding was coming lose in a few spots so I glued it back in place. The headstock has some kind of plastic overlay with Pearl inlays. I have to clean all the bad coating off that and try to restore it to some kind of glossy appearance.

At this point everything is fixed and the guitar is stripped and sanded. What makes it a shame is the original woods has some beautiful grains to it. It is begging to be stained. I am not sure what colors though. I am pretty sure I will leave the neck and back of the headstock natural. I am thinking the back and sides I might use an ebony gel stain. I would leave the front natural too but there is some discoloration I can't get rid of from where I removed the pick guard, and a few spots where it has some dents. They will show badly in a natural look. So will the dents I have to fill. I can't sand them all out because some are a bit deeper than sanding will safely remove.

I am contemplating a transparent blue for the front but it is out of my comfort zone.

What is a good free site to post some picture so I can link to them from here?
 

Creeper

Well-Known Member
Messages
13,971
Reaction score
17,741
Thanks.

So I lost the two pictures I took of the Gibson L-6 S before I repaired the neck crack and stripped it. But here are a few shots of the rest of the project.

First the shot of the headstock/neck repair. This is what started me on this process. The split in the wood was filled with Titebond, clamped to close the split and then sanded after 24 hours. The dark line is not the grain, it is the repair. The crack was actually open about 3/16" on the neck narrowing to just a hairline on the headstock (front and back).
03e7e0kc_o.jpg


Here is the guitar primed and hanging to dry. The four dots above the top pickup cutout are actually metal inserts for bolts that secure the bridge and tailpiece. I covered them with painters tape. I dread having to take the tape off without cracking the paint.

VXSIYvMi_o.jpg


Here it is fully painted.
mRsyQtG1_o.jpg


Repainted headstock with the decal I bought and applied. There is another decal I had to make and apply to the back of the headstock. I has the model number and serial number of the guitar. I know everything about waterslide decals now. LOL. It was no fun and I wasted so much toner ink trying to get it right. It is still not right but I would have needed to find a different color inkjet printer to get it perfect.
ydYuMbpo_o.jpg


The painted shots were taken before the clear coating was done. The decal headstock has a couple of coat of clear to seal the decal. Notice the crack that appeared near the truss rod nut cutout. (the truss nut is still covered with tape. The crack appeared after the 5th coat of color paint for some reason. it was part of the original crack and which I sealed and filled with crazy glue. Another one just like it appeared at the same time next to the tuning machine hole on the left. I had to sand out the paint down to the primer fill both cracks with crazy glue again then touch up the primer and repaint the headstock. One crack repair worked the one remained did not. I didn't bother filling it again because because it will be covered by the truss cover. Call me lazy.

I'll post some picture of the Guild acoustic tomorrow. That one is just stripped while I decide what to do with it. But I do have before pictures to show what poor condition it was in.
 

Rockport

AmberBeer
Messages
41,344
Reaction score
41,288
Crack is an understatement. It was a few pounds of pressure from being broken off I think. I like your idea though. I have 3000 grit sandpaper I can fix it to a flat object and make a pretty good tool to do exactly as you suggest.
Will the repaired crack affect the quality of the sound?
 

Creeper

Well-Known Member
Messages
13,971
Reaction score
17,741
Will the repaired crack affect the quality of the sound?
Good question. From everything I have read, it could depending on the position of the headstock. If there is a twist there might be some intonation issues. But those are easier to fix on an electric guitar than an acoustic because of the adjustable bridges. I have visually checked the neck and headstock and they appear to be ok. I will know the answer to your question once i get it back together and tune it. At least tightening the string won't snap the headstock off the neck anymore!
 

Creeper

Well-Known Member
Messages
13,971
Reaction score
17,741
Just to wrap this up, the guitar is finished, re-assembled and ready for whatever comes next. I need to clean one POT but otherwise it plays great with easy action. The sound quality is crisp in clean mode and mellow/smooth with gain. It is hard to explain but it the sound is somewhere in between my Les Paul and my Rickenbacker 480 in terms of sound with the Les Paul being more "vibrant" or in your face, and the Rickenbacker being a more subdued, almost tinny sound. The intonation was not effected by the neck repair. I have to make one simple bridge adjustment and it tuned up perfectly. Now that the its done I am not sure what to do with it. I will play it for a while and if I fall in love I will keep it. But I am 70 and having lot of guitars laying around is pointless, especially since I don't play that much anymore. I'd like to keep 1 electric and 1 acoustic. We'll see. The amp is for show. LOL. It is 50 watts or Marshall ear drum destruction! I have a couple of smaller amps with headphone ports I use to play.

As I mentioned in an earlier post I was concerned about sanding it down after the clear coat dried, but I sanded this down to a dull finish, smoothing out all the bumps and "orange peel", then used polishing compounds and car polish to buff it all out again. The finish is almost factory perfect now. I am glad I went through that process. I don't even like to touch it because the black shows every fingerprint and smudge!

poc3VJt6_o.jpg


btw, pro tip: If you have a guitar stand with rubber or rubber like polymer cushions on the rests, it is a good idea to cover them with soft cloth of some kinds because the rubber can react with certain guitar finishes. I used strips of an old T-shirt. Doesn't look pretty but it saves having some ugly blemishes on the guitar finish. The same is true for guitar cases. If you have a case with polyester fur lining, wrap the guitar in some kind of soft cloth. This guitar had the fur from its hard case embedded into the finish on the neck and on parts of the body, a reaction from heat and humidity - and probably nicotine from cigarette smoke.
 
Top